
I recently read a post in a pour over group on facebook. The user wrote: I have six grinders by now and wonder if I should start investing in better quality coffee too.
You may laugh, and some commenters did too, but it’s not uncommon for folks to expect their gear to save the day.
Have you ever wondered why your pour over is inconsistent, even though you follow the same recipe and you have all the right tools, even with good quality beans?
Most often it’s in the small details that are overlooked and underrated. In a commercial setting, we train to tweak quick, effective and starting the least drastic change. Here are ten simple things you can look at that increase your pour-over quality at home.
Filter Fit
Making sure that your paper filter sits snug all around the brewer makes a difference.
When it crinkles or folds in, some water will bypass unevenly and affect extraction. Gently push the filter down while you pre-wet it and mold it into the brewer, leaving space for the bypass channels (the ridges within the brewer, depending on model).
Heat Loss During The Pour
Say you select a brewing temperature of 203 ℉ for a light roasted, washed coffee with fruit notes and bright acidity. Even if you preheat your brewer, the moment you finish the first pulse and let the coffee bloom before continuing, your temperature goes down by at least 5 degrees. Which puts it into the range for more chocolate forward medium roast coffees with a coarser grind.
The reasons are that most temp kettles do not reheat water fast enough between pulses, and your coffee grounds store heat that is not available for extraction.
A consistent temperature throughout the pour makes a difference. When you dial in a new coffee, look at the appropriate range of brewing temps. Select a higher one to make up for the heat loss and tweak down as you go.
Rough ranges are: 185 - 195 ℉ for darker roasts, 195 - 201 ℉ for medium roasts and 202 - 205 ℉ for light roasts.
Appropriate Bloom Time
Most people know that blooming (degassing) your coffee is necessary to allow excess Carbon Dioxide / CO2 to escape. 30 secs. is an accepted standard but there is no one size fits all approach to blooming. An effective bloom time depends on the age and roast of your coffee.
The fresher the beans, the longer the bloom time. If your coffee is super fresh you might need to extend your bloom time until all CO2 has escaped. This also applies to darker roasts even if they are less fresh, as darker roasted coffees store more CO2 during the roasting process.
If you bloom too short or too long your overall result will be sub-par. Too short and the water will have to weasel its way around the gas bubbles on the way down. It will not be able to extract all the flavor compounds that make a cup great.
Too long and you effectively flatline the potential of your coffee by wasting much of the critical first 90 seconds of a brew. This is when most active compounds are released by movement.
There are exceptions with experimental processing methods, but most solid bloom times fall between 20 secs. for more aged beans, and 50 secs. for fresh ones. Watch your coffee bed until the bubbling ceases. Decrease bloom time as your coffee ages.
Rest Time For Whole Beans
Rest time is the pre-cursor of bloom time. It makes perfect sense that you want to dig in when you open a fresh bag of beans and get that amazing aroma. But as far as flavor goes, fresher is not always better. The younger the coffee, the more CO2 it contains. And not all of it can escape during the bloom time. That is why coffee bags usually have a two-way valve. It allows gas to escape while keeping air out. Allowing your beans to rest in the sealed bag for a minimum of five days is a good way to extract maximum flavor when you start brewing.
How many days exactly depends on roast and use. While five days used to be standard in most commercial environments, we now see beans that are processed and roasted differently - so an effective resting period can be up to 10 days for pour-over use and much longer for Espresso use. Start with five and and play with bloom time to begin.
Pulse Timing
If you follow any pour-over recipes, they usually include the initial pour, the bloom, and then two - three more pulses during which you add a certain amount of water.
For example:
Say your recipe is 18g coffee / 288g water (1:16 ratio). You start by adding 50 g of water and the bloom time is 30 secs. After that, you want to add 50 g water by the 60 secs. mark, then another 50 g by the 90 secs. mark, followed by the rest (138 g) water by the 2 mins. mark.
Most people keep an eye on the grams of water they add and the time markers, but not on how long they take for each pulse. Try to keep the time it takes to add each pulse the same. This makes a real difference for an overall even extraction.
Play with your pour speed and figure out how to pour 50 grams evenly in eight or ten seconds. Then see how you can add 100 grams in the same time. You don’t have to waste coffee for this, you can time it with water over a bowl.
Once you master your pour speed your brews will become more consistent.
The time you use to create movement works in partnership with the time during which you just allow gravity to do its job and pull water through the coffee.
An added, really neat, side benefit is that you improve your fine motor skills as you practice this.
Intentional Movement
Timing and movement are partners. Most people pour in more or less random spirals until the amount of water they want to add is in. That means they stop pouring whenever the grams needed are reached.
Not necessarily when all coffee grounds are evenly saturated. Being deliberate with how you direct the flow of water can go a long way towards even extraction. For example, for the initial pour: Start with moving in eight or ten smaller circles from the inside out and all around the brewer. Take your time and control your flow rate. Focus on ending where you started. Then, for the following pulses you might switch to a spiral, moving from the inside out, since that allows you to add water faster. This might all sound nerdy, but is in essence one of the great perks of making craft coffee to begin with. These techniques will not only improve the flavor in your cup, but also create soft mental focus.
Blog Vid Movement by Sweet Science Coffee
Adjusting Grind Size (Too Fast)
One of the first fixes that some homebrewers tend to apply is the last one that we apply in a commercial setting: grind size. Switching grind size makes sense when the cup is off beyond regular tweaking. “Off” meaning really under-extracted (sour, super short brew time), or over-extracted (very bitter, super long brew time). However, when a small tweak could fix the issue, a grind size adjustment is often overkill.
With a pour-over, many pieces work together: coffee age, process, roast, coffee quality, grind size, water quality, water temperature, tools, technique, time and ratio. Changes to any of these affect all others in some way.
Switching grind size has the largest immediate effect because it increases or decreases the size and number of particles you make available for extraction.
It is less of a tool to “fix it all” and more one to “change it all”.
The problem with this approach is that you simply don’t know what worked and what didn’t. Which can easily lead to a string of inconsistent brews and ongoing tweaks that border on guesswork.
For example, simply brewing a fruity coffee at a bit lower temperature can take the edge off its acidity by allowing some sweeter notes to come through.
Choosing a finer grind size on the other hand can easily imbalance the cup by introducing too many bitters during the longer brew time.
Adjusting Grind Size (Never)
The other side of the coin: There are home baristas that shy away from, or don’t think of, adjusting grind size at all. This is not uncommon and it’s understandable when you tend to enjoy the same types of coffees. Once dialed in, a fixed grind setting will do pretty good. But if you ever wonder why the same coffee suddenly changes flavor, even though you do the same things every day - it’s because nature kicks in and the coffee changes.
Checking and adjusting grind size is crucial when you switch to a new bag of coffee, when you switch to a new variety of coffee, when you work with a new tool, and when you use coffee over a longer time so that it ages enough to change characteristics.
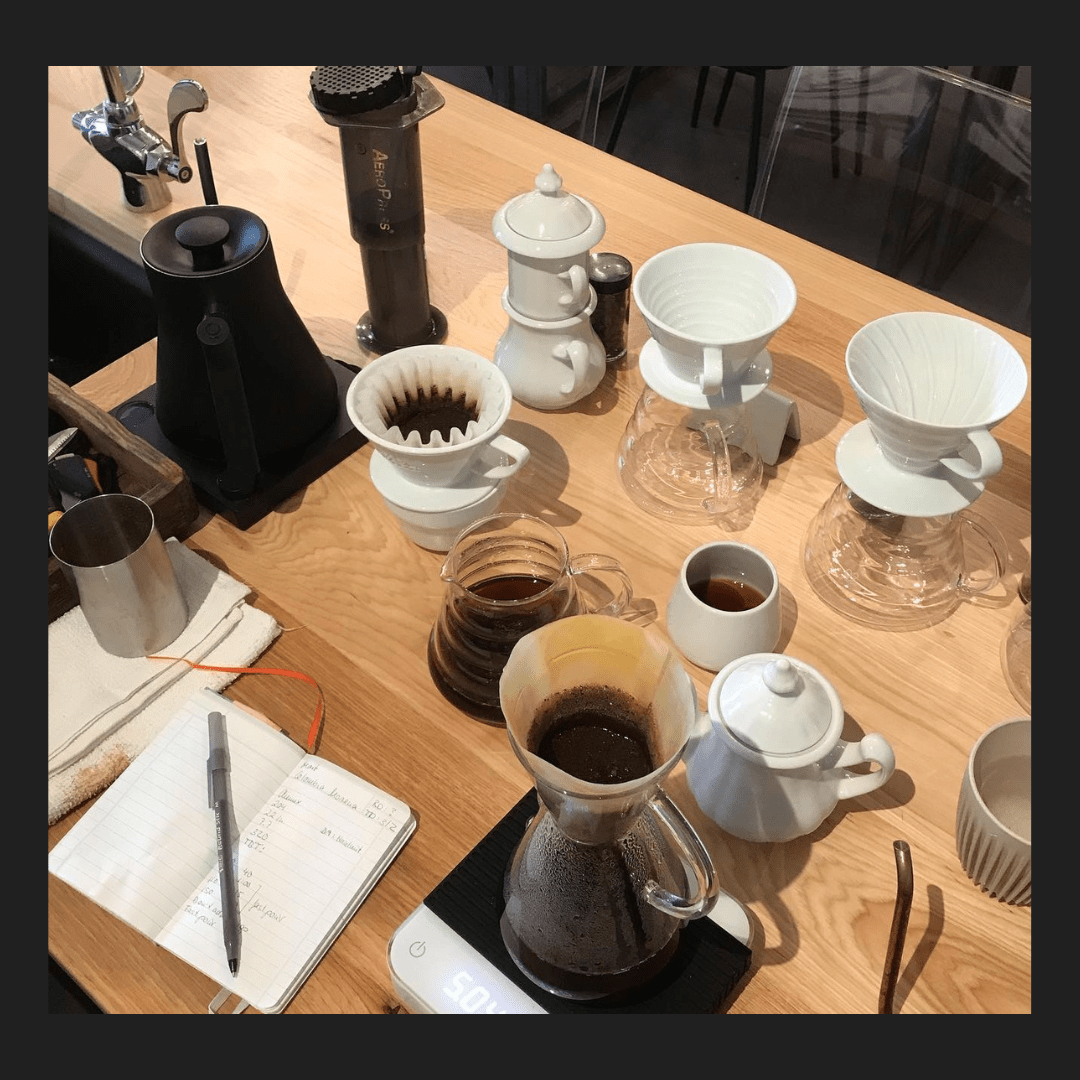
Note Taking
Not to get overly scholarly, but chances are if you are reading this, you are already very interested in pour-overs. In coffee, we ultimately aim to understand the chemistry of extraction. And in order to know where you are going it’s necessary to know where you’ve been. When you brew at home, tweak one thing at a time so you know what works and what doesn’t.
In time, you get a deep understanding of how all the pieces come together. It's about a framework that can be applied to and adjusted for different coffees. That's not to say follow a complicated protocol, this is supposed to be fun after all! Just jot down the type of coffee you use, its age, dose, recipe and your tool. When you taste, write a quick line about what you like or dislike, and select one thing that you will do differently the next time. No need to know all about flavor notes and use fancy terminology. Just spit it out (the notes, not the coffee). One of my baristas started out with writing things like “yuk” or “hmm not sure” in her journal. After a few months the journal looked like a piece of art with coffee stains and rings all over, but over time she developed one of the most refined palates I’ve ever come across and eventually went on to become a mixologist doing competitions.
Don’t Drink Coffee Piping Hot
This is not a tweak in a strict sense, but an awareness of the effect that drinking temperature has on flavor perception will open up a new way of tasting coffee for you. Heat is a pain sensation, not a flavor. Your taste is impaired when you sip a really hot fluid (or an iced one for that matter). When coffee cools down over a period of time, you will be able to taste clear and more subtle differences in flavor. This does not only help you develop your palate and figure out what you like or dislike. It also gives you more accurate pointers to determine what you want to adjust, if anything. Tasting from 140 ℉ down to room temp is great. You don't have to do this every time, but when you brew a new coffee it's a great way to stretch your palate.
The Unfiltered Bottom Line
These are a number of small tweaks you can apply and play with on your coffee journey. The ones I mention here are the lesser known and sometimes underrated ones.
The point is, you don’t have to suffer through those last three (or five) cups that are just okay-ish because your beans change character when they age.
Enjoy!